![]()


Abogen is a powerful text-to-speech conversion tool that makes it easy to turn ePub, PDF, or text files into high-quality audio with matching subtitles in seconds. Use it for audiobooks, voiceovers for Instagram, YouTube, TikTok, or any project that needs natural-sounding text-to-speech, using Kokoro-82M.


demo.mp4
This demo was generated in just 5 seconds, producing ∼1 minute of audio with perfectly synced subtitles. To create a similar video, see the demo guide.
Go to espeak-ng latest release download and run the *.msi file.
- Download the repository
- Extract the ZIP file
- Run
WINDOWS_INSTALL.batby double-clicking it
This method handles everything automatically - installing all dependencies including CUDA in a self-contained environment without requiring a separate Python installation. (You still need to install espeak-ng.)
Note
You don't need to install Python separately. The script will install Python automatically.
# Create a virtual environment (optional)
mkdir abogen && cd abogen
python -m venv venv
venv\Scripts\activate

# For NVIDIA GPUs:
pip install torch torchvision torchaudio --index-url https://download.pytorch.org/whl/cu128

# For AMD GPUs:
# Not supported yet, because ROCm is not available on Windows. Use Linux if you have AMD GPU.

# Install abogen
pip install abogen# Install espeak-ng
brew install espeak-ng
# Create a virtual environment (recommended)
mkdir abogen && cd abogen
python3 -m venv venv
source venv/bin/activate
# Install abogen
pip3 install abogen# Install espeak-ng
sudo apt install espeak-ng # Ubuntu/Debian
sudo pacman -S espeak-ng # Arch Linux
sudo dnf install espeak-ng # Fedora
# Create a virtual environment (recommended)
mkdir abogen && cd abogen
python3 -m venv venv
source venv/bin/activate
# Install abogen
pip3 install abogen
# For NVIDIA GPUs:
# Already supported, no need to install CUDA separately.
# For AMD GPUs:
# After installing abogen, we need to uninstall the existing torch package
pip3 uninstall torch
pip3 install --pre torch torchvision torchaudio --index-url https://download.pytorch.org/whl/nightly/rocm6.4Tip
If you get WARNING: The script abogen-cli is installed in '/home/username/.local/bin' which is not on PATH. error, run the following command to add it to your PATH:
echo "export PATH=\"/home/$USER/.local/bin:\$PATH\"" >> ~/.bashrc && source ~/.bashrcTip
If you get "No matching distribution found" error, try installing it on supported Python (3.10 to 3.12). You can use pyenv to manage multiple Python versions easily in Linux. Watch this video by NetworkChuck for a quick guide.
Special thanks to @hg000125 for his contribution in #23. AMD GPU support is possible thanks to his work.
If you installed using pip, you can simply run the following command to start Abogen:
abogenTip
If you installed using the Windows installer (WINDOWS_INSTALL.bat), It should have created a shortcut in the same folder, or your desktop. You can run it from there. If you lost the shortcut, Abogen is located in python_embedded/Scripts/abogen.exe. You can run it from there directly.
- Drag and drop any ePub, PDF, or text file (or use the built-in text editor)
- Configure the settings:
- Set speech speed
- Select a voice (or create a custom voice using voice mixer)
- Select subtitle generation style (by sentence, word, etc.)
- Select output format
- Select where to save the output
- Hit Start

Here’s Abogen in action: in this demo, it processes ∼3,000 characters of text in just 11 seconds and turns it into 3 minutes and 28 seconds of audio, and I have a low-end RTX 2060 Mobile laptop GPU. Your results may vary depending on your hardware.
- Supported formats:
ePub,PDF, or.TXTfiles (or use built-in text editor) - Speed: Adjust speech rate from
0.1xto2.0x - Voices: First letter of the language code (e.g.,
afor American English,bfor British English, etc.), second letter is formfor male andffor female. - Voice mixer: Create custom voices by mixing different voice models with a profile system.
- Generate subtitles:
Disabled,Sentence,Sentence + Comma,1 word,2 words,3 words, etc. (Represents the number of words in each subtitle entry) - Output formats:
.WAV,.FLAC,.MP3,.OPUSandM4B (with chapters)(Special thanks to @jborza for chapter support in PR #10) - Save location:
Save next to input file,Save to desktop, orChoose output folder - Chapter Control: Select specific
chaptersfrom ePUBs orchapters + pagesfrom PDFs. - Save each chapter separately: Save each chapter in e-books as a separate audio file.
- Project folder: Save the converted items in a project folder with available metadata files.
- Options:
- Replace single newlines with spaces: Replaces single newlines with spaces in the text. This is useful for texts that have imaginary line breaks.
- Configure max words per subtitle: Configures the maximum number of words per subtitle entry.
- Subtitle format: Configures the subtitle format as
srt,ass (wide),ass (narrow),ass (centered wide), orass (centered narrow). - Separate chapters audio format: Configures the audio format for separate chapters as
wav,flac,mp3, oropus. - Create desktop shortcut: Creates a shortcut on your desktop for easy access.
- Open config.json directory: Opens the directory where the configuration file is stored.
- Open temp directory: Opens the temporary directory where converted text files are stored.
- Clear temporary files: Deletes temporary files created during the conversion or preview.
- Check for updates at startup: Automatically checks for updates when the program starts.
- After conversion:
Open file,Go to folder,New conversion, orGo back.

With voice mixer, you can create custom voices by mixing different voice models. You can adjust the weight of each voice and save your custom voice as a profile for future use. The voice mixer allows you to create unique and personalized voices. (Huge thanks to @jborza for making this possible through his contributions in #5)
When you process ePUB or PDF files, Abogen converts them into text files stored in your temporary directory. When you click "Edit," you're actually modifying these converted text files. In these text files, you'll notice tags that look like this:
<<CHAPTER_MARKER:Chapter Title>>
These are chapter markers. They are automatically added when you process ePUB or PDF files, based on the chapters you select. They serve an important purpose:
- Allow you to split the text into separate audio files for each chapter
- Save time by letting you reprocess only specific chapters if errors occur, rather than the entire file
You can manually add these markers to plain text files for the same benefits. Simply include them in your text like this:
<<CHAPTER_MARKER:Introduction>>
This is the beginning of my text...

<<CHAPTER_MARKER:Main Content>>
Here's another part...
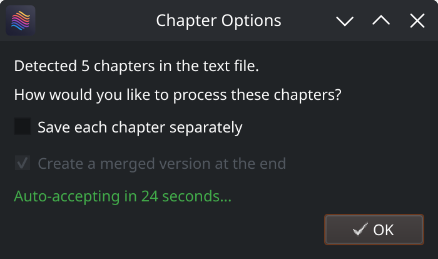
When you process the text file, Abogen will detect these markers automatically and ask if you want to save each chapter separately and create a merged version.
Similar to chapter markers, it is possible to add metadata tags for M4B files. This is useful for audiobook players that support metadata, allowing you to add information like title, author, year, etc. Abogen automatically adds these tags when you process ePUB or PDF files, but you can also add them manually to your text files. Add metadata tags at the beginning of your text file like this:
<<METADATA_TITLE:Title>>
<<METADATA_ARTIST:Author>>
<<METADATA_ALBUM:Album Title>>
<<METADATA_YEAR:Year>>
<<METADATA_ALBUM_ARTIST:Album Artist>>
<<METADATA_COMPOSER:Narrator>>
<<METADATA_GENRE:Audiobook>>
# 🇺🇸 'a' => American English, 🇬🇧 'b' => British English
# 🇪🇸 'e' => Spanish es
# 🇫🇷 'f' => French fr-fr
# 🇮🇳 'h' => Hindi hi
# 🇮🇹 'i' => Italian it
# 🇯🇵 'j' => Japanese: pip install misaki[ja]
# 🇧🇷 'p' => Brazilian Portuguese pt-br
# 🇨🇳 'z' => Mandarin Chinese: pip install misaki[zh]
For a complete list of supported languages and voices, refer to Kokoro's VOICES.md. To listen to sample audio outputs, see SAMPLES.md.
I highly recommend using MPV to play your audio files, as it supports displaying subtitles even without a video track. Here's my mpv.conf:
# --- MPV Settings ---
save-position-on-quit
keep-open=yes
# --- Subtitle ---
sub-ass-override=no
sub-margin-y=50
sub-margin-x=50
# --- Audio Quality ---
audio-spdif=ac3,dts,eac3,truehd,dts-hd
audio-channels=auto
audio-samplerate=48000
volume-max=200
If you want to run Abogen in a Docker container:
- Download the repository and extract, or clone it using git.
- Go to
abogenfolder. You should seeDockerfilethere. - Open your termminal in that directory and run the following commands:
# Build the Docker image:
docker build --progress plain -t abogen .

# Note that building the image may take a while.
# After building is complete, run the Docker container:

# Windows
docker run --name abogen -v %cd%:/shared -p 5800:5800 -p 5900:5900 --gpus all abogen

# Linux
docker run --name abogen -v $(pwd):/shared -p 5800:5800 -p 5900:5900 --gpus all abogen

# MacOS
docker run --name abogen -v $(pwd):/shared -p 5800:5800 -p 5900:5900 abogen

# We expose port 5800 for use by a web browser, 5900 if you want to connect with a VNC client.
Abogen launches automatically inside the container.
- You can access it via a web browser at http://localhost:5800 or connect to it using a VNC client at
localhost:5900. - You can use
/shareddirectory to share files between your host and the container. - For later use, start it with
docker start abogenand stop it withdocker stop abogen.
Known issues:
- Audio preview is not working inside container (ALSA error).
Open temp directoryandOpen configuration directoryoptions in settings not working. (Tried pcmanfm, did not work with Abogen).
(Special thanks to @geo38 from Reddit, who provided the Dockerfile and instructions in this comment.)
Abogen is a standalone project, but it is inspired by and shares some similarities with other projects. Here are a few:
- audiblez: Generate audiobooks from e-books. (Has CLI and GUI support)
- autiobooks: Automatically convert epubs to audiobooks
- pdf-narrator: Convert your PDFs and EPUBs into audiobooks effortlessly.
- epub_to_audiobook: EPUB to audiobook converter, optimized for Audiobookshelf
- ebook2audiobook: Convert ebooks to audiobooks with chapters and metadata using dynamic AI models and voice cloning
- Add OCR scan feature for PDF files using docling.
- Add chapter metadata for .m4a files. (Issue #9, PR #10)
- Add support for different languages in GUI.
- Add voice formula feature that enables mixing different voice models. (Issue #1, PR #5)
- Add support for kokoro-onnx (If it's necessary).
- Add dark mode.
If you encounter any issues while running Abogen, try launching it from the command line with:
abogen-cli
This will start Abogen in command-line mode and display detailed error messages. Please open a new issue on the Issues page with the error message and a description of your problem.
I welcome contributions! If you have ideas for new features, improvements, or bug fixes, please fork the repository and submit a pull request.
If you'd like to modify the code and contribute to development, you can download the repository, extract it and run the following commands to build or install the package:
# Go to the directory where you extracted the repository and run:
pip install -e .      # Installs the package in editable mode
pip install build     # Install the build package
python -m build       # Builds the package in dist folder (optional)
abogen                # Opens the GUI
Feel free to explore the code and make any changes you like.
- Abogen uses Kokoro for its high-quality, natural-sounding text-to-speech synthesis. Huge thanks to the Kokoro team for making this possible.
- Thanks to @wojiushixiaobai for Embedded Python packages. These modified packages include pip pre-installed, enabling Abogen to function as a standalone application without requiring users to separately install Python in Windows.
- Thanks to creators of EbookLib, a Python library for reading and writing ePub files, which is used for extracting text from ePub files.
- Special thanks to the PyQt team for providing the cross-platform GUI toolkit that powers Abogen's interface.
- Icons: US, Great Britain, Spain, France, India, Italy, Japan, Brazil, China, Female, Male, Adjust and Voice Id icons by Icons8.
This project is available under the MIT License - see the LICENSE file for details. Kokoro is licensed under Apache-2.0 which allows commercial use, modification, distribution, and private use.
Important
Subtitle generation currently works only for English. This is because Kokoro provides timestamp tokens only for English text. If you want subtitles in other languages, please request this feature in the Kokoro project. For more technical details, see this line in the Kokoro's code.
Tags: audiobook, kokoro, text-to-speech, TTS, audiobook generator, audiobooks, text to speech, audiobook maker, audiobook creator, audiobook generator, voice-synthesis, text to audio, text to audio converter, text to speech converter, text to speech generator, text to speech software, text to speech app, epub to audio, pdf to audio, content-creation, media-generation