Quick Start Guide
Current page is designed to allow users to quickly set up and start using OpenNARS system
There are multiple ways to start OpenNARS: download executable ready-to-use .jar binary or compile from source
Java 8 is the minimum requirement for the purpose of running OpenNARS, Java 8 or later versions can be downloaded from here
For executable version, simply download .zip file from here to an accessible location on your machine, then extract the file, navigate to OpenNARS/bin and run opennars-lab-3.x.y-SNAPSHOT.jar
To be able to compile and run from source code the following is required:
1. Java jdk 1.8 or higher
2. git
3. Maven can be obtained from https://maven.apache.org/download.cgi
4. Java, git and Maven must be written to environment variables such that they are accessible from terminal
Note: In order to use OpenNARS launcher, OpenNARS needs to be installed in three stages:
a. Terminal version of OpenNARS where Narsese statements can be entered from the terminal only
b. OpenNARS GUI where Narsese statements are entered within GUI, and derivations, output and other useful info can also be seen
c. OpenNARS Lab - test cases that demonstrate NARS functionality and abilities
1. Create a directory and navigate to it, let call this directory a root
2. Clone git repository by issuing command git clone https://github.com/opennars/opennars.git
3. For Windows users only, skip this step if using Unix or MAC. In order for maven to find valid JDK JAVA_HOME variable must point to the correct location, just set it to your directory of JDK.
Example: set JAVA_HOME="C:\Progra~1\Java\jdk1.8.0_121"
4. Navigate to opennars directory where pom.xml can be found and type mvn install, the building process will start. Note: It should take about 5-7 minutes to complete since it will be running some tests. It is possible to skip tests by issuing command: mvn install -DskipTests=True
5. Stage 1 is done! To run OpenNARS from terminal just navigate to opennars/target/ directory and issue command java -jar opennars-3.0.0-SNAPSHOT.jar It should start, register with the shell and you should be able to enter Narsese statements to communicate with the system.
6. To set up OpenNARS with gui, navigate to root directory
7. Clone OpenNars-GUI by issuing command git clone https://github.com/opennars/opennars-GUI.git
8. Once completed navigate to opennars-GUI directory and issue command mvn install, building process will start, it should take few minutes to complete, again tests can be skipped
9. Step 2 is done! To run OpenNARS with GUI support just navigate to opennars-GUI/target/ directory and issue command java -jar opennars-3.0.0-SNAPSHOT.jar
11. To set up OpenNARS with launcher and test examples, navigate to root directory
12. Clone OpenNars-LAB by issuing command git clone https://github.com/opennars/opennars-LAB.git
13. Once completed navigate to opennars-LAB directory and issue command mvn install, building process will start, it should take few minutes to complete.
14. Step 3 is done! To run OpenNARS Launcher just navigate to opennars-LAB/target/ directory and issue command java -jar opennars-3.0.0-SNAPSHOT.jar
Once all the steps are completed root directory should contain three folders:
opennars
opennars-GUI
opennars-LAB
Once the jar file is running, you will be greeted by the OpenNARS launcher. This lists a variety of applications that allow for interaction with a NARS agent. In addition, the launcher provides links to the wiki, website, and communication channels.

For now, the most important of these is the ‘Main GUI’ option.
Clicking the Main GUI button will open an instance of the OpenNARS GUI which offers many capabilities. The main one is providing a means to enter Narsese sentences into the system, so that they can be parsed and added to the memory of the agent, as well as be processed in real time. In addition, the GUI provides the immediate responses of the system, as well as shows the current activities in it.
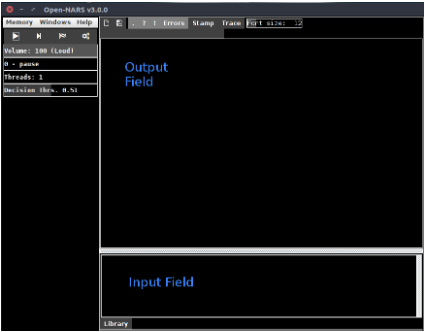
The left-hand side contains the control elements for the system. The four fields (volume, pause, threads, and decision threshold) represent configuration parameters that influence the workings of the inference engine, especially relevant is volume that filters by task priority. If it's set to lowest value, the GUI will only show answers to questions and operator executions, while every inference result will be shown when it's set to maximum.
The play button allows the user to pause, and restart the system. When paused, the system will not perform inference cycles, and the output of the system will stop. The button next to this allows a user to ‘step through’ a single inference cycle.
The largest of the three panels is the output area for the system. This is the area where the current workings of the system will be displayed. These will show up as Narsese statements that represent user inputs and derived tasks.
The pane below this is the input field for the GUI. Here a user can input lines of Narsese statements to be provided to the system. To test this out, try inputting the following simple sentences:
<Sam --> Man>.
<Man --> Animal>.
<Sam --> Animal>?
The input field can accommodate multiple lines of input text. Once any text is entered into the field, an input button will appear. After selecting this, the system will attempt to parse the text, and if properly formatted Narsese is found, the sentence will be entered into the actual NARS agents memory. You can also use "Ctrl-Enter" to enter the text.
Once the text is inputted (try the above statements out!) you should see the output panel echo back the statements. Once the ‘play’ button is hit, the system will start performing inference cycles. The derived statements that result from this will appear in the output panel.